Take inspiration from English gardens by creating this generous border of perennials, which will remain elegant for a long time and brighten up your summer.
Preperation
Install this bed preferably in spring, but you can proceed until the end of June, provided you ensure watering next summer. Start by carefully loosening the soil using a spade. Take the opportunity to add an organic fertilizer , such as compost or decomposed manure.
Purchase guide
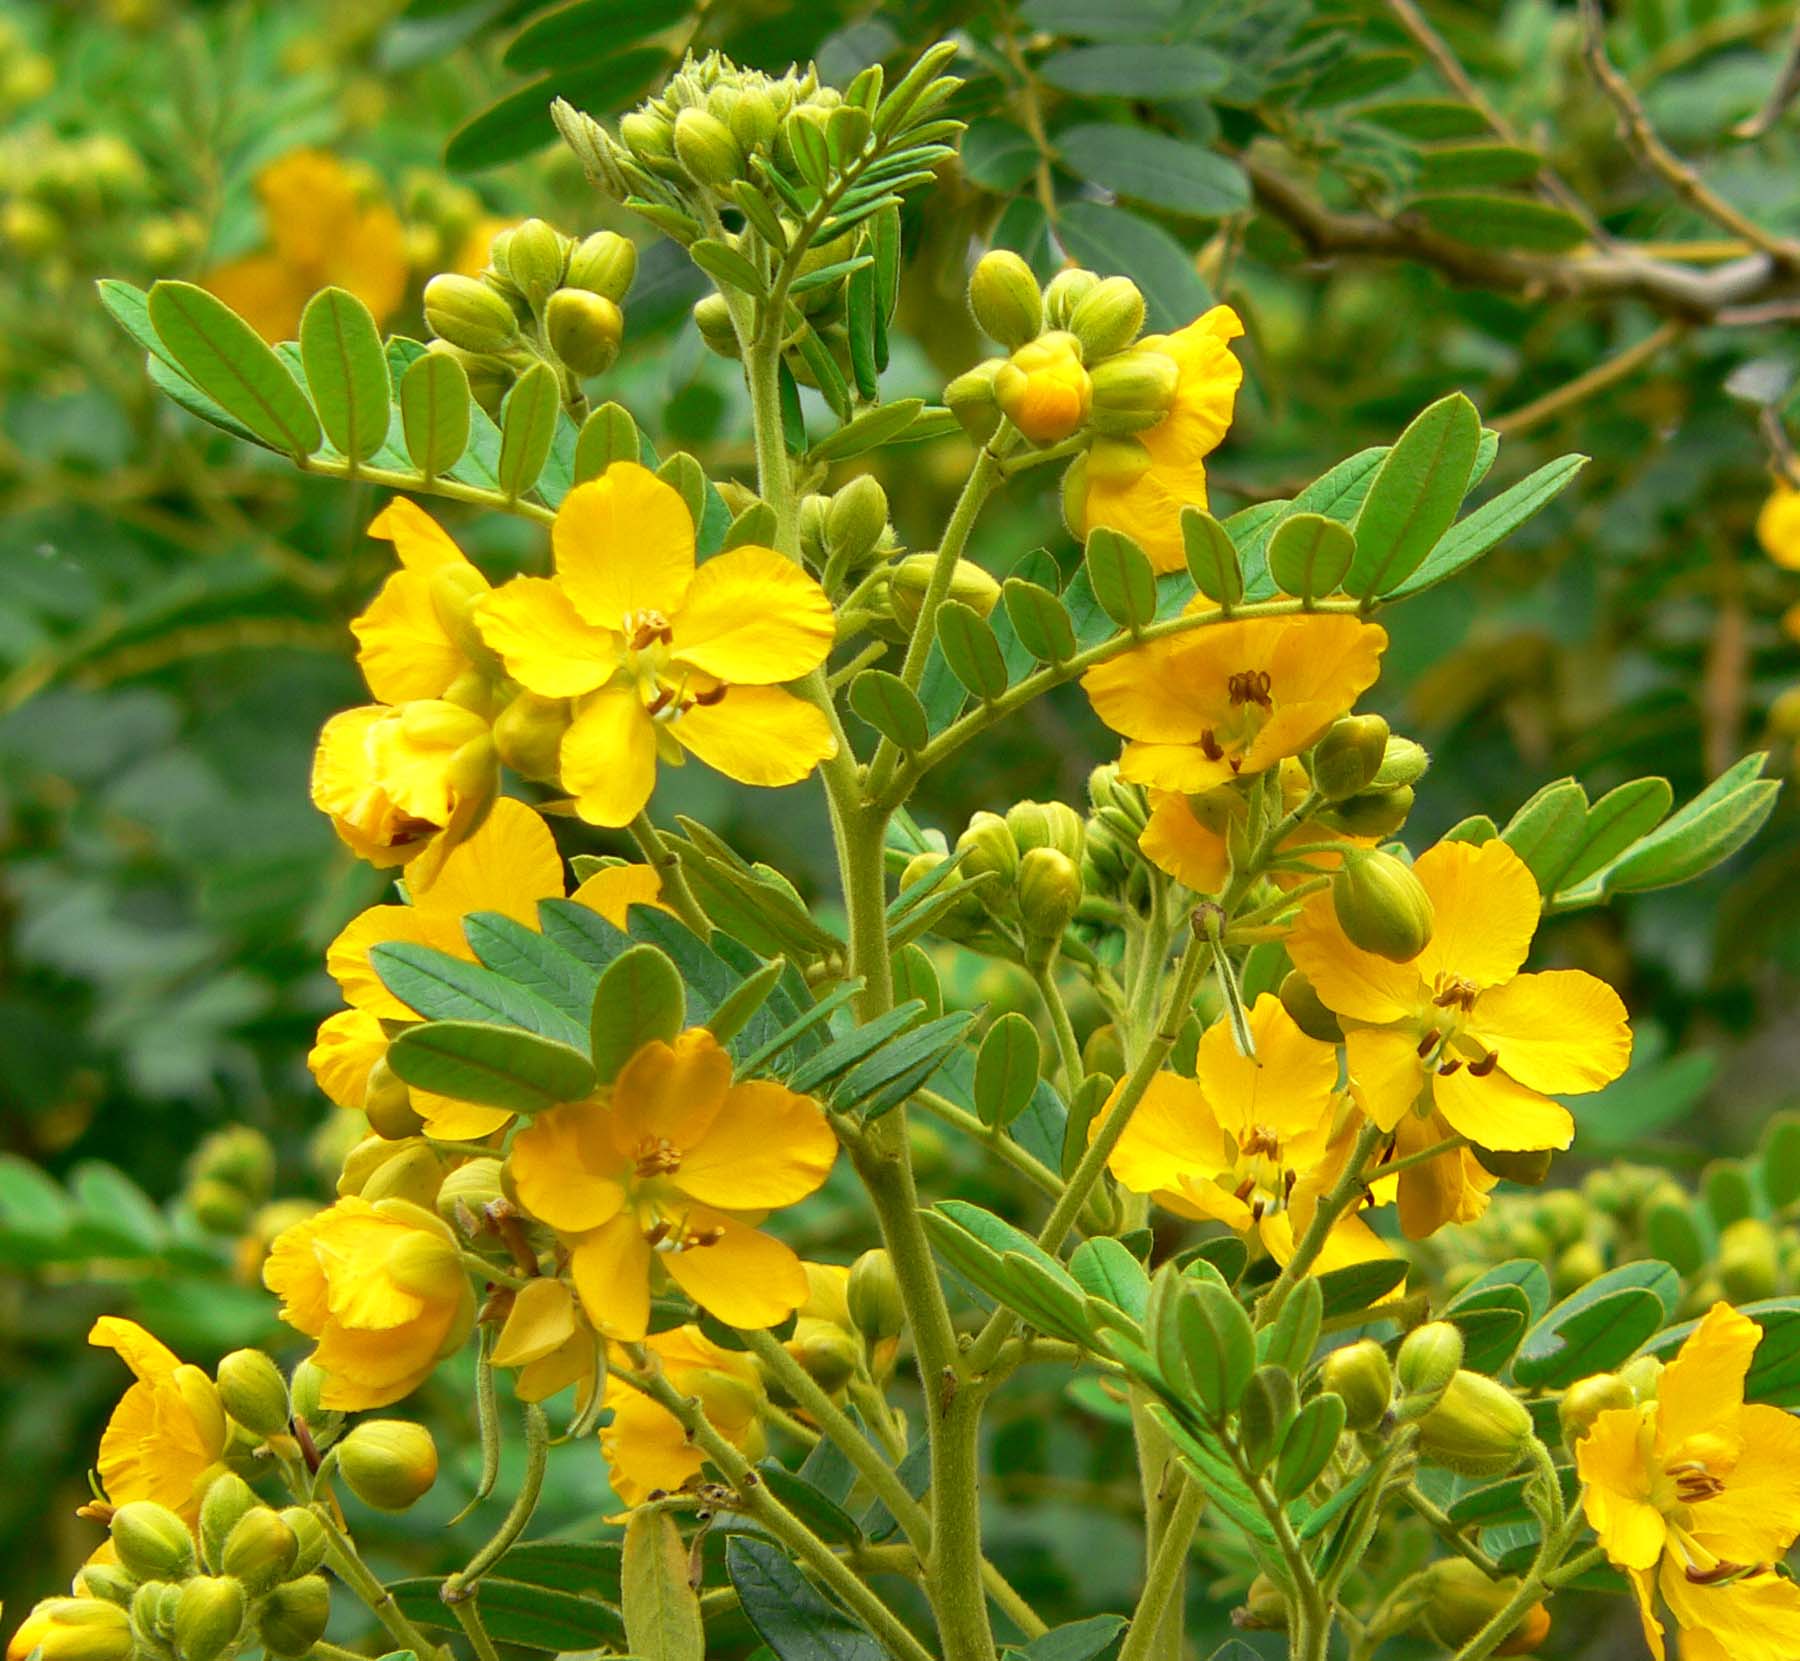
Obtain grasses and perennials grown in pots. Opt for container-raised senna (cassia), which you’ll buy from a nurseryman specializing in exotic species.
Planting
Arrange the plants on the ground to judge the effect obtained. Moisturize the roots of senna well before planting it, then install grasses and perennials by digging holes with a dibble.
Maintenance
During the season, cut dead flowers and water as soon as the soil dries up. In the fall, protect senna and euryops or place them in a greenhouse for the winter . At the end of it, you will prune their twigs before taking them out in May, cut the dry stubble of the phalaris and the foliage of the lupine. In March, you will cut down the silver baskets and helichrysum and decompact the soil before spreading fertilizer and mulch.
Practical advice
Where to install it?
In a sunny position to prolong flowering and obtain colorful foliage, and in drained soil , because these plants prefer dry soil, without excess.
Completion time
2 to 3 hours for tillage and planting.
Cost
200 € for a 5 m² massif
Good to know
In cold regions, you will protect the senna, frost, either by wrapping the stump and the branches in a thick wintering veil, or by repotting it in October, after having pulled it up, to winter it under cover.
How to make this composition
Delimit a rectangular border of 1.20 m wide by 2 m long.
In the center and at the bottom of the massif, 60 cm from the edge, put the senna in place. Around it, 60 cm from its trunk, distribute the euryops. At the front of the massif, plant phalaris , lupine , helychrisum and silver baskets 25 cm from each other.
This last step can be reproduced and put end to end to create a circular mass.
Boss plan
Senna (Senna corymbosa) 1 shrub
Euryops (Euryops pectinatus) 3 plants
Lupine ( Lupinus ‘Le chandelier’) 1 plant
Phalaris ( Phalaris arundinacea var. Picta) 3 plants
Mow the lawn and cut perennials along the edges for a clean grass path.
The perennials that line the paths will also have benefited greatly from their vacations. Depending on the variety, it will be necessary to cut the deflowered stems or support the inflorescences that are too heavy . The passage of the mower in alleys narrowed by the overweight of the beds becomes a real headache. At the same time, you will have to respect the perennials at the edge while cutting the relatively tall grass.
The right gesture
Support taller plants with a line before the machine passes. The installation of small paving stones at the height of the grass constitutes a solution to limit the progression of the grass in the massif, but also to mow more easily, without risk of cutting your flowering plants.
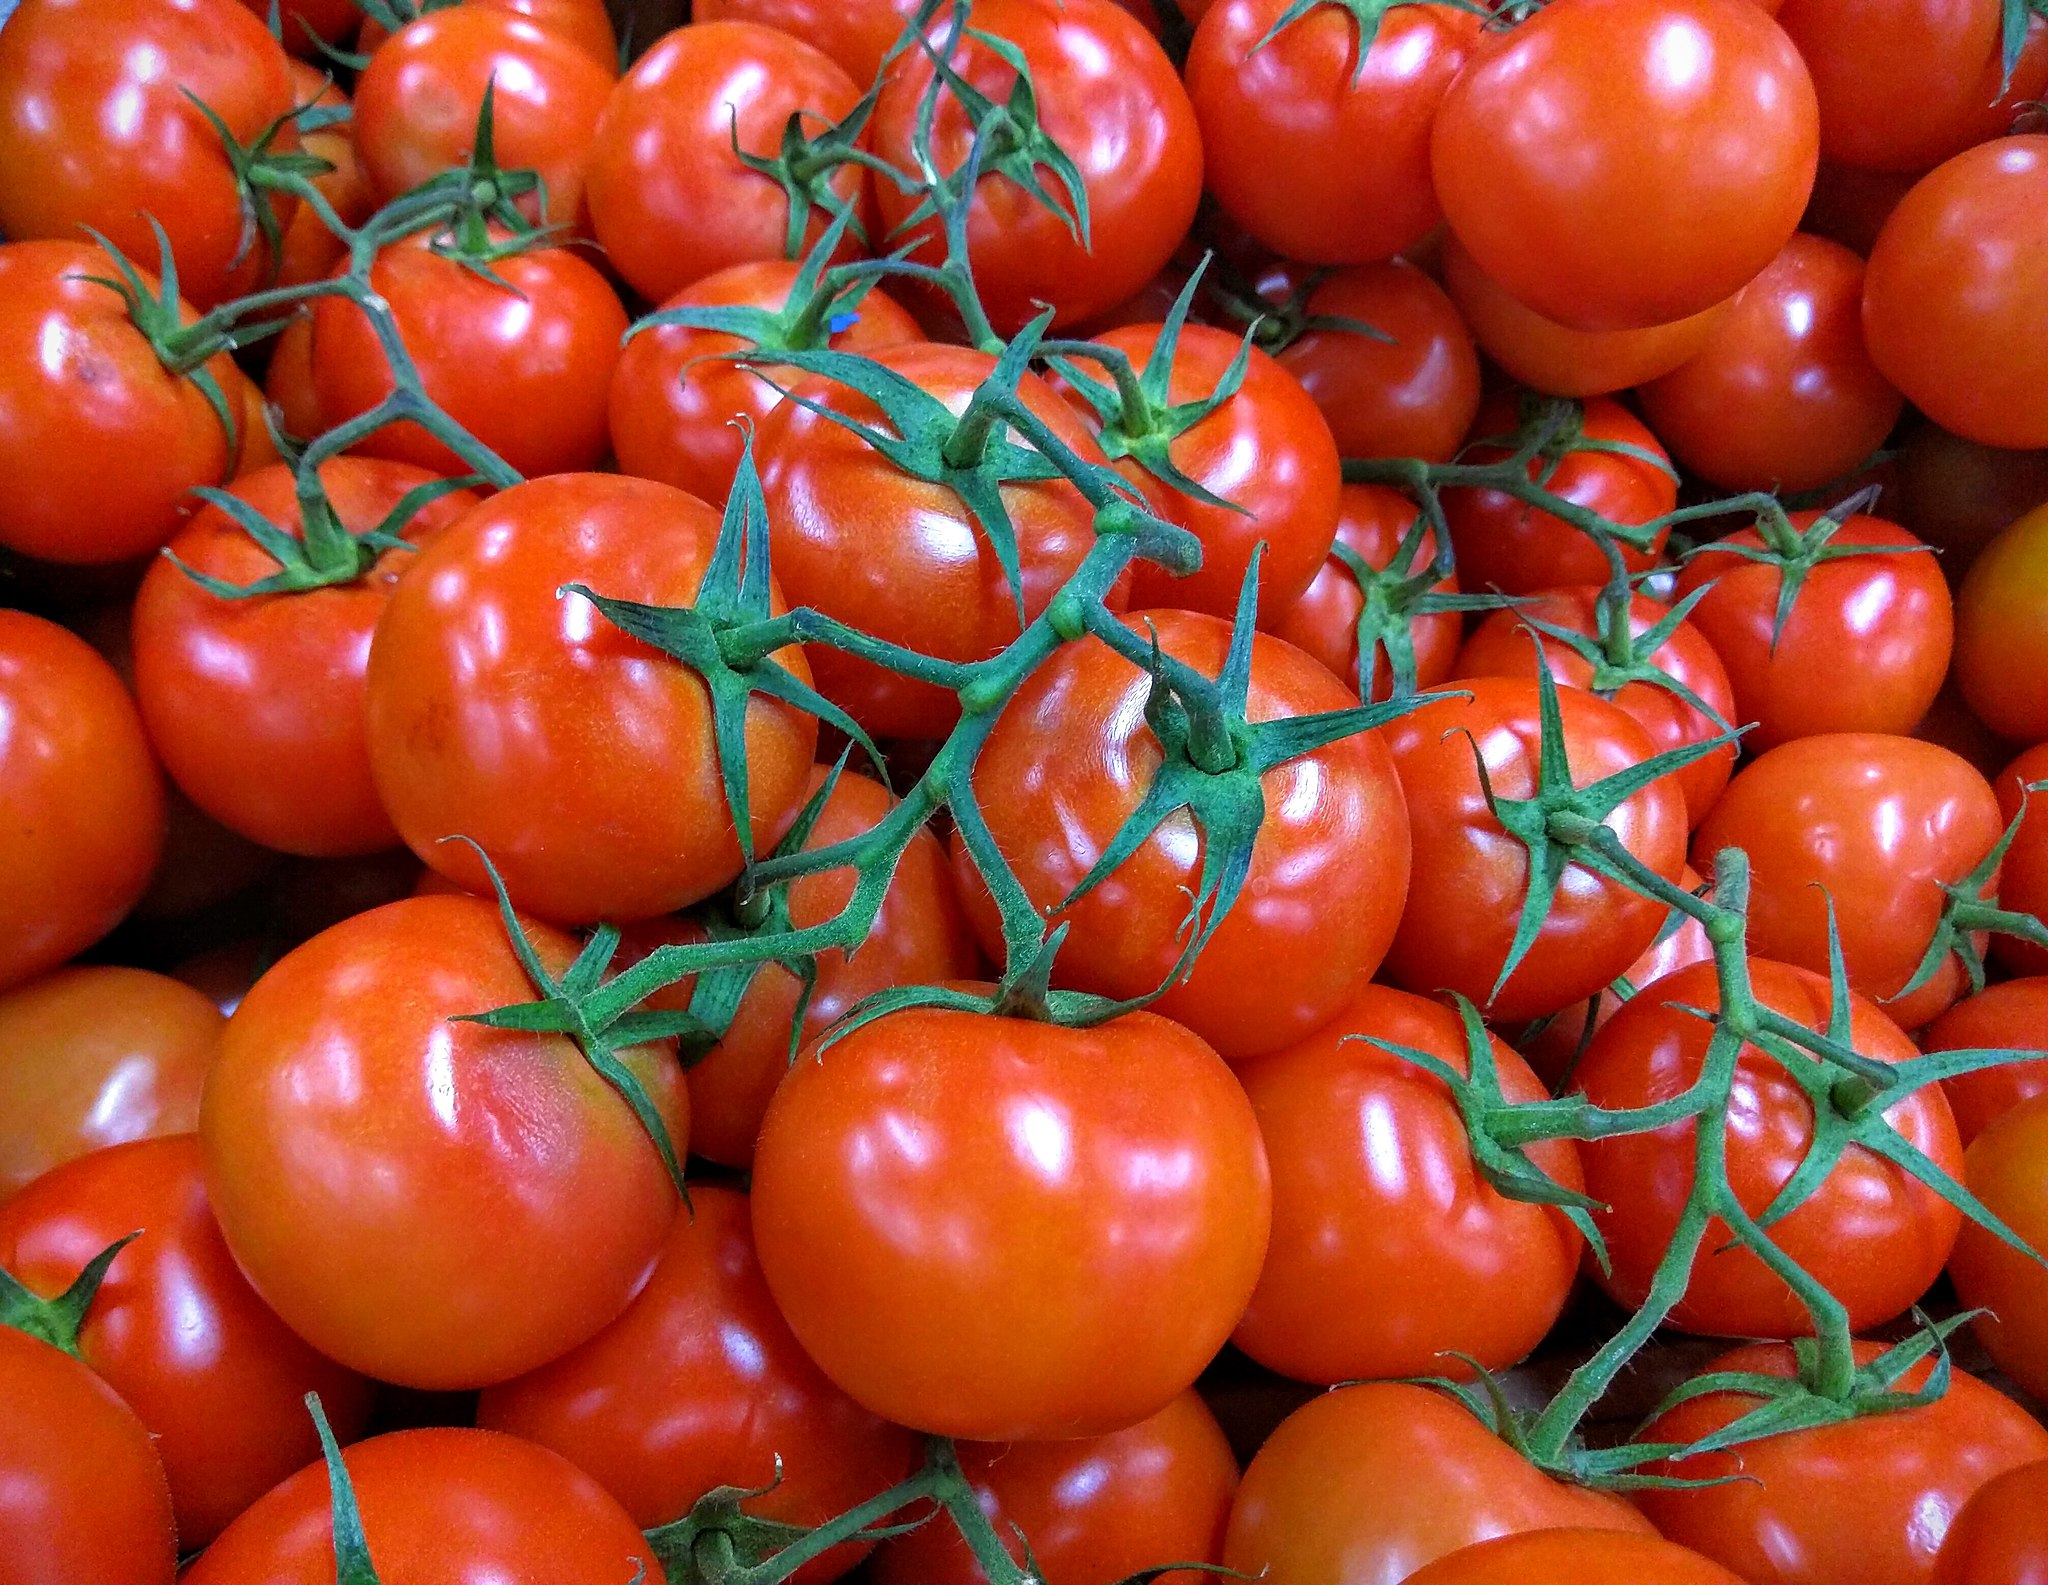
The best gestures in the vegetable garden to grow and then harvest garden tomatoes with the lunar calendar.
Pick the tomatoes at full maturity and respect the lunar dates, they are then full of sun and vitamins. For which varieties? The old varieties because they reproduce faithfully by this method of multiplication: the sowing of the harvested seeds will give fruits similar to those of the parents. They are also more difficult to find in stores, you have to buy them by mail order from specialists.
Harvesting the seeds – 1
Find the most beautiful fruits on the best plants. Both should be vigorous, free from disease. The tomatoes have the characteristic shape of the variety and are very ripe. Pick them delicately by hand. Do not mix varieties. Use different or labeled containers.
Harvesting the seeds – 2
At home, cut the tomatoes into quarters and, with a spoon, drop the pulp and seeds into a glass container. You can add a trickle of water. Wait a few days (approximately 48 hours in hot weather), depending on the ambient temperature, until white mold appears on the surface. Watch carefully, because if you delay the seeds will germinate. Indeed, this fermentation has the effect of eliminating the gelatin which surrounds the seeds and it keeps them dormant.
Harvesting the seeds – 3
Pour the pulp into a fine mesh colander and run the tap water to clean the seeds. Remove pulp and small or poorly formed seeds. Let them drain then place them on a smooth surface, tiles or a plastic cover, but especially not on absorbent paper, they will stick to them when drying.
Harvesting the seeds – 4
Separate them from each other because the drying must be fast, otherwise, the seeds can get moldy. Choose a dry, well-ventilated place without direct sunlight. When they are completely dry, put them in paper bags or in small glass jars. Write down the name of the variety and the year of harvest. The germination period is at least four years or even ten years for some varieties.
Sowing in pots
Before the end of April, sow the tomatoes in peat cups if possible, in a special sowing soil. Put 3 seeds per jar, cover lightly, tamp and spray with water. Place in a greenhouse or a bright room, at 16-20 ° C. Keep the best looking plant in each pot and keep at 16-18 ° C and a little humid until planting. If the plant is getting too long, it is lacking in light.
The plantation
To avoid sowing, you can buy seedlings. Install them in the garden, in a sunny place, from mid-May. Plant in rows 70 cm apart, spacing the feet 50 cm apart. Open holes twice the size of the cups. Soak the plants, do not deposit those in peat cups. Bury the base 5 cm to strengthen the rooting. Prick a stake near the root ball, fill it up.
Pruning and other care
Tie the stem to the stake with raffia as it grows. Once a week, cut off the young shoots that form in the axils of the leaves with your fingernails. Head the main stem 1 or 2 leaves above the 5th bunch of fruits to promote their enlargement. Water without wetting the foliage.
The harvest
Every day, harvest the most colorful fruits by checking their maturity: take them in the palm of one hand and, with the thumb of the other hand, exert pressure on the bulge of the peduncle located above the tomato. If the stem does not break, do not insist, the fruit is not quite ready.
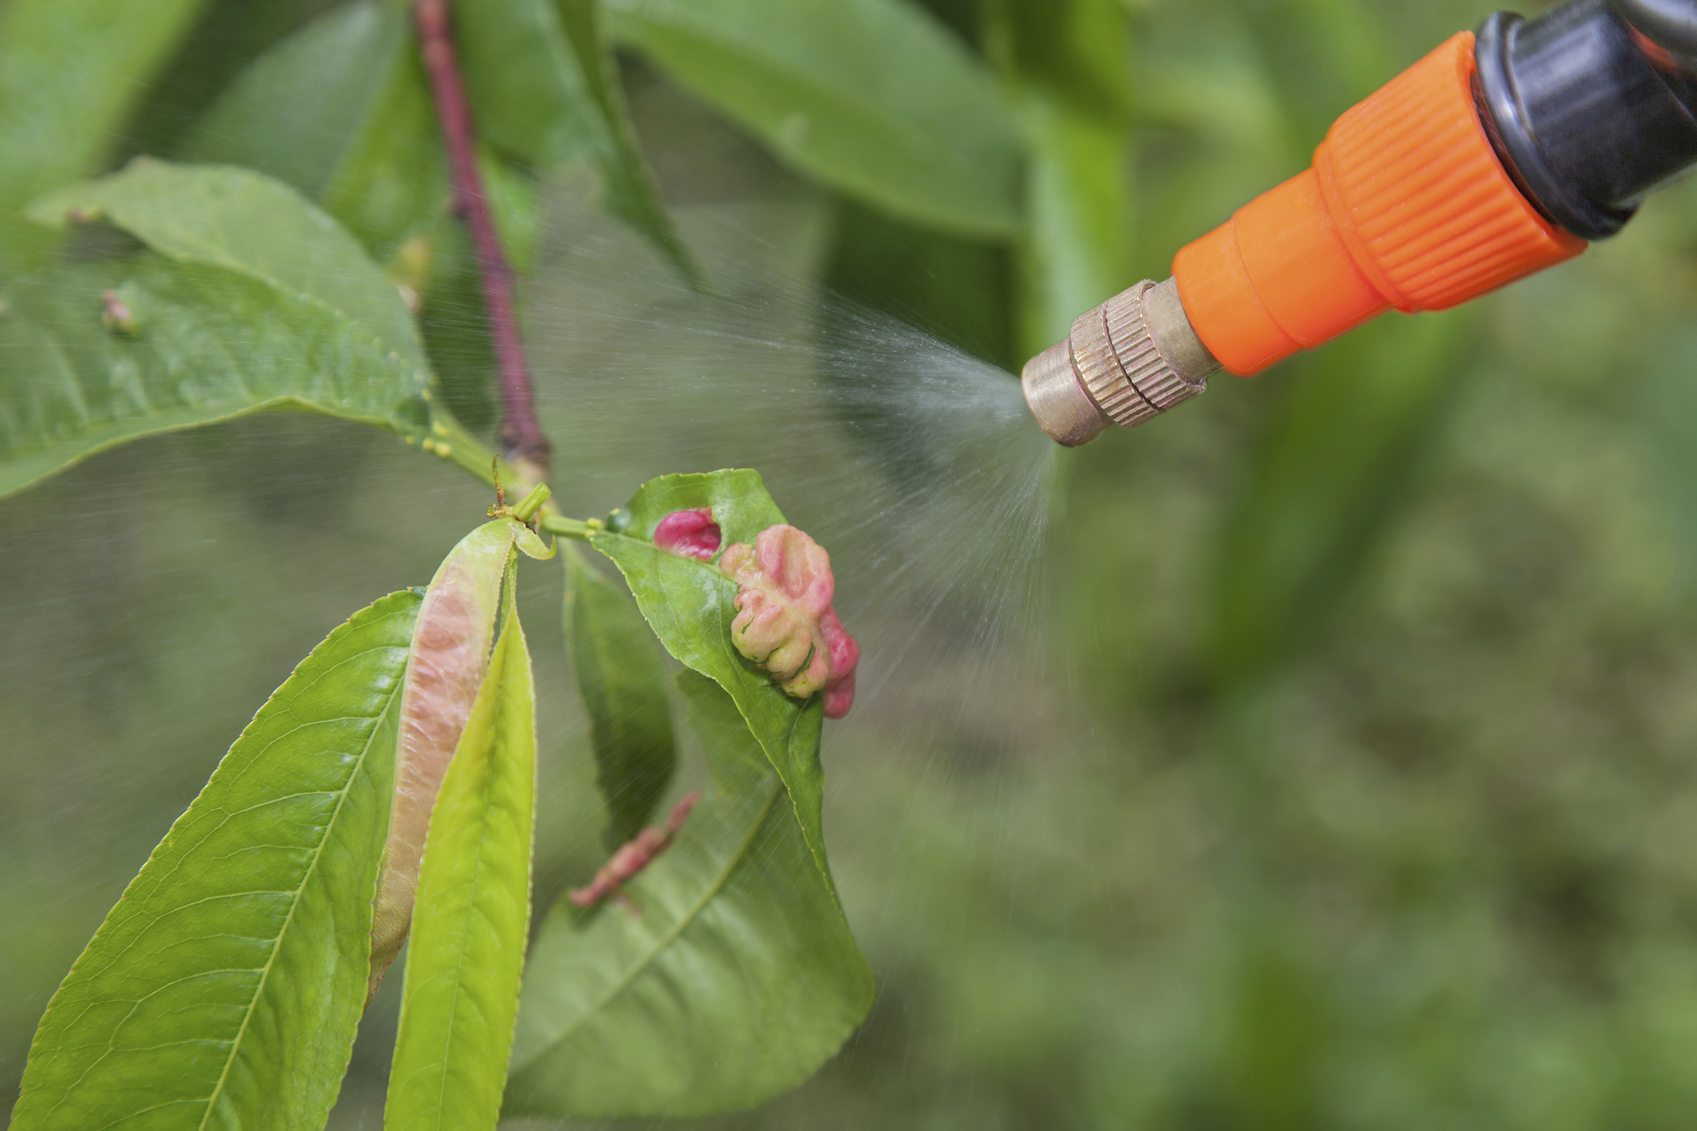
With the cold season, trees, ornamental shrubs and roses on one side, but also fruit trees on the other, seem spared from summer diseases and pests. Do not be fooled by appearances because, well hidden and sheltered, they are waiting for the warm weather to strike again. Flush them out with natural products.
Winter is a good time to treat, if the weather is good. The gardener has a little time, the interventions are carried out at a distance from the harvests and limit those to be done during the growing season. The operation involves first removing the eggs, parasite larvae and disease spores. To do this, before spraying the products on the trunks and large branches of fruit trees, ornamental shrubs and large trees, get rid of the lichens and moss that cling to them (Example: cleaning the bark of the pear tree). They are not directly dangerous, but shelter the overwintering forms of parasites or diseases, and hinder the good penetration of the treatments in the cracks of the bark. Treat roses and conifers as well.
The different natural treatments
In winter and until bud break, use organic products such as lime- based solutions to fight against fungi and white oils (rapeseed, with insecticidal properties) . They get rid of the eggs and larvae of many parasites (aphid, codling moth, psyllid) or disease spores (powdery mildew, scab). It will also be necessary to provide specific care for certain tree species depending on the diseases to which they are particularly prone. Also think about horsetail or nettle decoctions , real natural fortifiers to make yourself.
Take the weather into account
To be effective, winter treatments are carried out during a mild period, without the risk of rain in the days to come. This would run off the treatment before it had time to act; it needs to stay in contact with pests and diseases present on trees and shrubs. Likewise, store the products if the wind is raging: during the application, they would be deflected, including in your direction. Do not treat, either, during severe frosts, as liquid treatments will make the buds and bark more sensitive to cold.
Shelter the auxiliaries
Some of the pests are eliminated by animals that are easily attracted to your garden. Insectivorous birds (chickadees, nuthatches, creepers) devour the eggs and larvae of parasites (aphids, carpocapses, flies, mites) which overwinter in bark crevices. In summer, they take care of adults and caterpillars. Bats catch many insects in flight. Ladybugs, lacewings and earwigs appreciate aphids, while hedgehogs delight in slugs and snails.
To welcome these precious allies, provide them with natural shelters such as: country hedges , piles of wood, bundles of twigs with hollow wood or pith , evergreen shrubs… Install nesting boxes, bird feeders , shelters suitable for ladybugs, lacewings and hedgehogs in the garden .
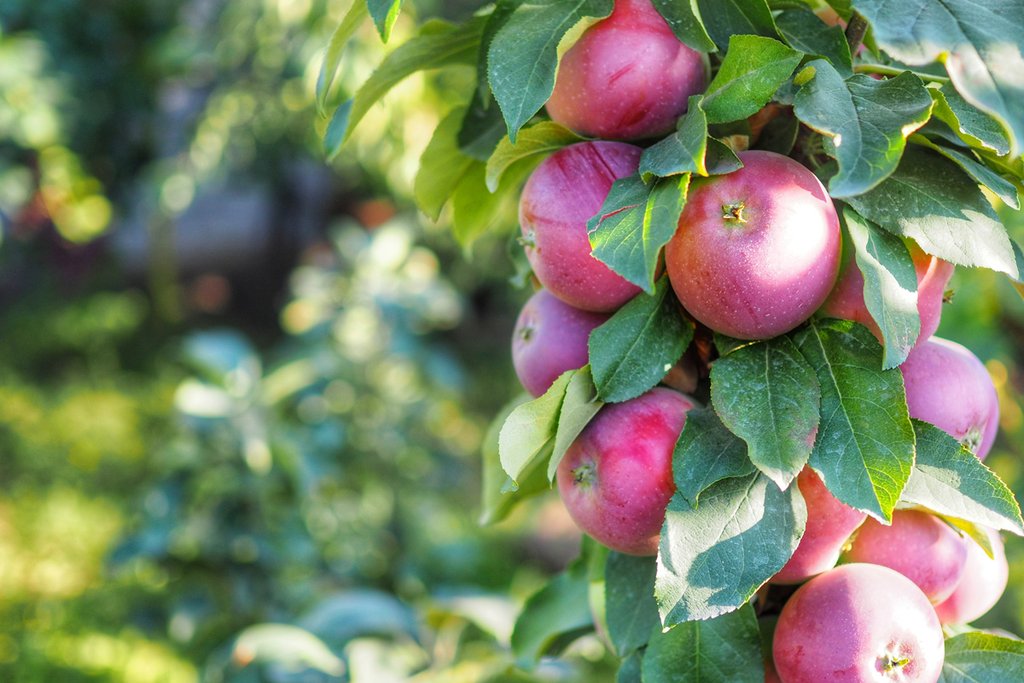
Present in small gardens for several years, colonial apple trees are available in different varieties that are increasingly numerous. Small point of the day.
At first glance, these apple trees are just trees that forgot to expand, but their real advantage is almost no pruning . Thanks to genetic work on chromosome 10, it does not develop side branches but a central axis. Result: the size is deleted.
But a columnar remains an apple tree and its rootstock should match your soil. Look to producers for what is right for you. In addition to the soil, its vigor is essential in order to keep the characteristics viable for a culture in container or in a small garden. The rootstock must therefore be dwarfing, so that the tree does not exceed 3 meters in height.
Maintain a distance of 1 meter between the apple trees. Remember to guard them for the time of a good rooting. Pollination is best with several compatible varieties. Fruit set takes one to two years , much faster than for standard apple trees. In addition, their resistance makes it possible to limit or even eliminate treatments. More accessible, they are also more easily treated when needed.
In nature, all animals know how to adapt to winter conditions. But in the garden, some of them might need a little help.
Hedgehogs, snails, frogs … all warm!
Several animal species, including hedgehogs , prepare for winter by building up fruit reserves. In order to survive, they adjust their metabolism to the climate of the region. Other mammals hibernate with a body temperature that is higher than that of their environment. On the other hand, the body temperature of cold-blooded animals (amphibians, fish or even mollusks) varies according to that of the environment. Thus, in very cold weather, they go into lethargy, after having manufactured organic substances or partitions preventing them from freezing.
Earthworms
Although slower, earthworm activity continues into the winter. They feed on organic matter which they transform into humus. To do this, they descend lower, under the layer of frozen earth.
To help them: spread manure, plant debris or compost on the ground on your flowerbeds. It will freeze less quickly and the auxiliaries appreciate this food.
Goldfish in the basin
Snuggled up in algae or aquatic plants, goldfish reduce their activity and feed little. In a pool at least 80 cm deep, they fear neither low temperatures nor surface ice.
To help them: let a bundle of wood float; oxygen will pass through if ice forms. If the basin is shallow, put them in a sheltered basin, without feeding them.
Frog
The cold causes a decline in the vitality of the frog. Almost asleep, she buried herself in the mud to spend the winter there without expending energy and without eating. If ice forms, it will survive thanks to the glucose in its organs acting as antifreeze, but it will take several hours to come out of its torpor.
To help it: remember to leave mud on the edges of the water point.
Hedgehog
It is under a pile of branches or leaves that the hedgehog arranges its shelter by padding it with moss. During hibernation, its temperature drops and its vital functions slow down. He wakes up periodically to feed on his reserves and stretch his muscles a little.
To help him: set up a nest filled with dead leaves . Don’t wake him up for any reason.
Snail
The snail overwinters in a hole which it closes with slime which, as it hardens, will protect it from the cold. In addition, it obstructs its shell with an operculum. It no longer feeds and decreases its vital functions. His oxygen consumption drops by half, and his heartbeat slows considerably. In case of momentary softening, it can then regain its activity.
Some regions are subject to particular climatic conditions. Our local correspondents explain the actions, sowing, planting and harvesting to you in the garden in a mountain climate in July.
Prune the vine
At the beginning of July, after fruit set, I stalk my vine . If the elders planted their vines against the south facade of the house, in the mountains, the maturity of the grapes often depends on the mild autumns. Tired of sour grapes and inspired by a wise neighbor, I undertook last year to remove every second bunch: the harvest was smaller, but the grapes were sweeter …
Maintain the pool water
In summer, care must be taken to maintain the water level in the ponds by adding water often so as not to drop the temperature suddenly, which would harm plants and animals. The summer heat warms the water in the pools all the more quickly as they are shallow and protected from the wind. This benefits the water lilies , but in small pools the temperature rises very quickly and becomes dangerous for the flora and fauna. in fact, the more the water heats up, the more its oxygen concentration decreases. To avoid such a situation, regular watering with a jet in small pools improves the quality of the water , refreshes it, oxygenates it and raises the level. For larger ponds or ponds, installing a pump , which creates a water jet , is a solution. A good cleaning of the banks and the removal of some of the overly invasive plants limit the degradation of plants in the water, which is also harmful. You can break the water jet to remove the chlorine and water the basin by oxygenating it. Place a board against an edge: the insects will drink without drowning and the trapped animals will be able to escape.
Maintain the lawn
As summer approaches, I prepare the grass to withstand the heatwave. I aerate the grass by scarifying it , and feed it with a well-decomposed compost, then I water generously. In fact, watering must be infrequent but abundant so that the water reaches the roots. I mow higher, leaving the grass in place, it will play the role of a mulch, maintaining the humidity.
Caring for rock garden plants
Adapted to extreme climates, plants in high altitude rock gardens require little maintenance. It is nevertheless important to provide them with soil in the summer so that they grow. And water regularly, for a good implantation. I make sure to spread the blooms by installing carnations, campanulas, helianthemums , geraniums for the summer, and asters and gentians for the end of the season.
For more vigorous irises
While there is a magnificent species endemic to the Pyrenees, Iris latifolia, most varieties of iris are hybrids, very hardy. Every 3 to 5 years, these plants need to be divided. In the mountains, July is the right time to divide the irises , because the rhizomes, too numerous, lack space and suffocate. Unearth them and take the opportunity to work the soil, weed it and amend it a little. Keep only the healthy parts and replant them, leaving them flush: for a good flowering next year, the rhizomes must take the sun. Irises, with infinite colors, have few requirements as to the quality of the soil. Well established, they tolerate drought. But, in marshy ground, install Iris sibirica or I. pseudoacorus, better adapted species.
How to have beautiful tomatoes in a mountain climate
Growing tomatoes in the mountains requires some gardening skills. This tropical plant needs warmth: the cool springs and the short summer season can sometimes be a source of problems. To remedy this, grow these plants in a greenhouse . Thus, the tomatoes can be planted early enough. The plants are protected from bad weather and sometimes very marked cold returns in June. In summer, water the tomatoes abundantly: for each plant, every 2 or 3 days, a watering can (10 l) of warmed water. Once in two, dilute nettle manure (10%): it is an extraordinary nitrogen fertilizer. The slurry of comfrey, used in addition, promotes fruit formation. Finally, to limit evaporation, cover the soil with 10 cm of straw .
Actinidia, a vine that must be tamed
Prune actinidias (kiwis) to contain their lush vegetation. This after the pruning of fruiting which took place, as for the vine, before the rise of sap, during the first half of March. This pruning allows the stems to be renewed, which is important because the fruits appear on the wood of the year. The actinidia is a liana which produces during the summer a multitude of long stems covered with clusters of very small fruits. This is when it is time to act! Remove suckers, stems without flowers or fruit, and shorten all branches to 4 leaves after the last bunch of fruit. Take the opportunity to thin out and keep only 2 or 3 kiwis per bunch. This size in greenimproves fruit ripening and growth.
Sow these plants which produce a juice or nectar which attracts pollinators. The latter, after having satiated and covered themselves with pollen, will fertilize other flowers in the garden.
Nectar for everyone! Pollinators are very useful in the garden. They carry pollen from one plant to another and thus ensure the fertilization of crops. You understood it well: without them, there is no abundance. To attract them, introduce honey species whose flowers produce a lot of nectar. There is a wide range of plants with varied smells. Some will rather bait the bee, the queen of the foragers. But others will turn the heads of pacifist bumblebees, butterflies or even aphid-eating hoverflies. By sowing different plants known for their melliferous quality, you promote biodiversity. By favoring plants with various flowering periods, pollinators forage in your garden for a long time. Aromatic, ornamental plants… there is a choice!
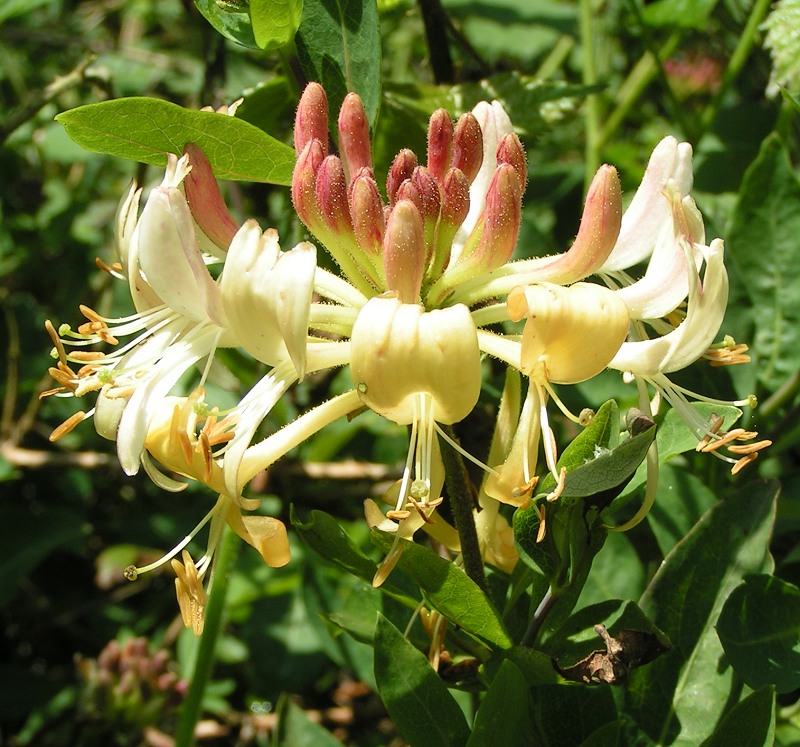
Honeysuckle
Latin name: Lonicera Caprifoliaceae Flowering: from June to September
In summer, butterflies bring honor to your garden if it hosts a honeysuckle. Indeed, its nectar, nestled in the hollow of deep-throated flowers, can only be foraged by insects with a long proboscis. Another peculiarity: the honeysuckle becomes more fragrant at nightfall and attracts moths such as the sphinx. Two varieties are particularly honeyed: Lonicera fragrantissima and L. tatarica. Honeysuckle is an evergreen shrub that appreciates dry, rather acidic soils and slightly shaded areas. In the garden, it is easy to find a place for it, it grows without problem on a structure (arbor or vault) or as a simple hedge.
Money basket
Latin name: Lobularia maritima Brassicaceae (anc. Cruciferae) Flowering: from April to October
The silver basket has the advantage of giving many small white flowers, fragrant, which last a long time. Its smell is differently appreciated, some find that it smells of urine and others that it exhales honey. Anyway, the bumblebees know how to appreciate it! Thanks to its highly branched shape, it is ideal for use in beds. It also forms a very good ground cover, perfect for controlling weeds. The silver basket likes the sun and drained soils. Supporting the wind and spray, it adapts perfectly to maritime situations. By eliminating the faded flowers, you promote a second flowering.
Wallflower
Latin name: Cheiranthus cheiri Brassicaceae (anc. Cruciferae) Flowering: spring
Here are small flowers which bees are very fond of. A biennial or perennial variety of the same family as cabbage, yellow wallflower or ravenella blooms in spring. With its upright habit, its many branches and its gold and orange colors, it blends in perfectly with flower beds. If the yellow wallflower is rather easy to grow, it is nevertheless better to plant it in areas protected from the wind, against a wall for example, as well as in dry soils. These conditions will allow it to flourish for several years, without special intervention. For long-lasting blooming, remove faded flowers as you go.
Large daisy
Latin name: Leucanthemum maximum Asteraceae (ancient Compositae) Flowering: June to September
These plants are perfect for small foragers such as hoverflies. Robust, measuring up to 90 cm in height, these large daisies bear flat white flowers (8 cm in diameter) with a yellow heart. They do well in many situations, but the ideal is to provide them with a rather cool and well-drained soil. Large daisies and daisies (L. vulgare) are non-perennial plants. You will find in the trade of varieties with single or double, giant, normal or dwarf shapes. In any case, pollinators love daisies a lot, passionately, madly… daisies.
Lavender
Latin name: Lavandula Lamiaceae (anc. Labiee) Flowering: from May to August This
is one of the best honey plants (25 known species). Bushy, it is rustic, ideal to withstand all situations: from the driest to the coldest temperatures. To grow successfully, it must receive enough light, be protected from the wind and have dry feet. You will find about twenty varieties on the market that produce a good amount of nectar. In addition to its use in cooking, here are plants that once dried will make excellent potpourris as well as sachets that will perfume your laundry. In short, a honey plant with multiple uses!
Rosemary
Latin name: Rosmarinus officinalis Lamiaceae (anc. Labiee) Flowering: from February to May
Rosemary has a powerful capacity for producing nectar. In trade, its honey is also very famous both for its taste and for its stimulating and digestive properties. In the garden, this shrub will make an excellent bait for bees at a time when few ornamental plants are blooming. Its flowers, lavender blue to deep blue, bell-shaped, persist for several months. Rosemary finds its place in a sunny area, but also sheltered from the wind. It makes perfect use of poor, dry and limestone soils. This essential aromatic herb in cooking is also a very useful honey plant.
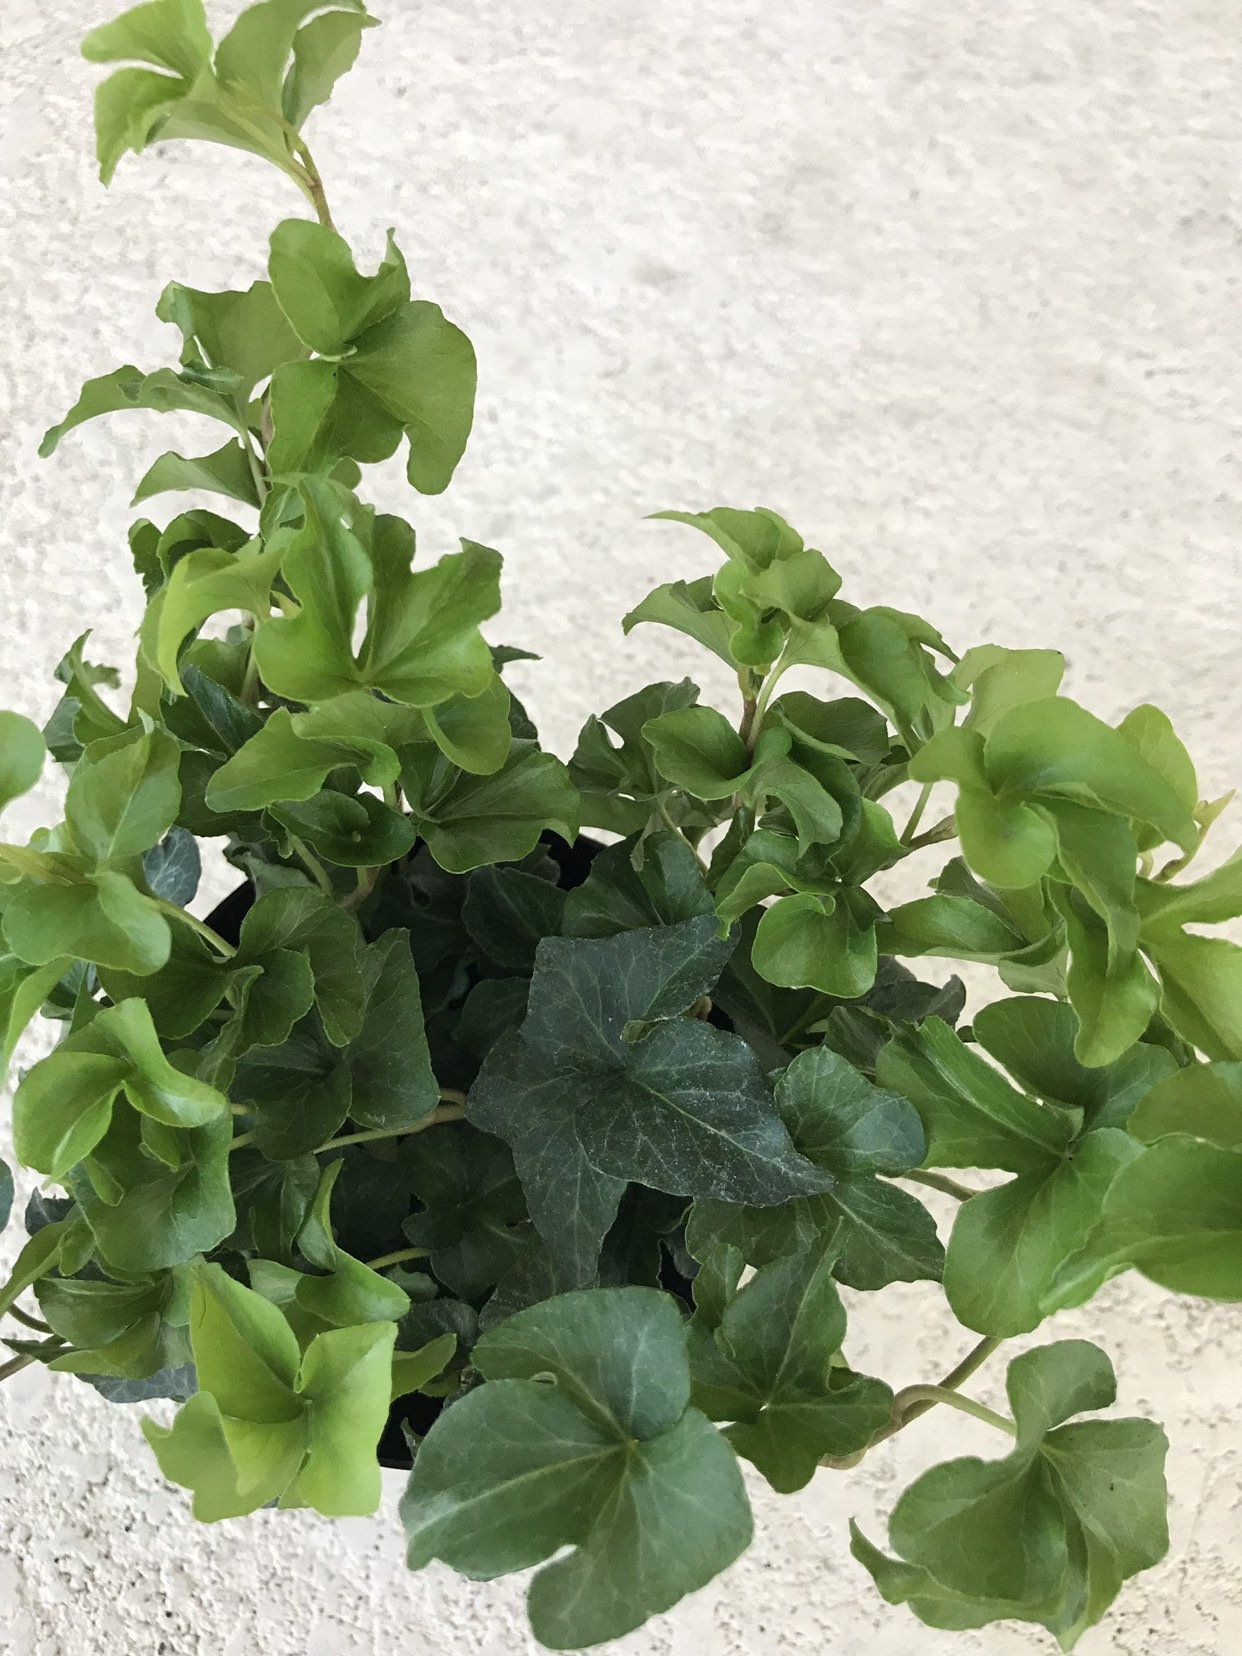
Among the infinite world of ivies, Hedera helix ‘Parsley Crested’, all curly, still manages to amaze us. To plant without delay …
With its quirky, curly, crumpled, bright green foliage, ‘Parsley Crested’ Curly Ivy is very decorative. The medium-sized leaves consist of three rounded lobes. The stems, green with purple reflections, take on red tones in winter. Easy to place because it hardly exceeds 2 m in height, it is delightful as a ground cover as well as a small climber. Wire mesh, wall, fence, pillar or shrub without much ornamental interest can serve as a support.
To install it in a pot, choose a jar, so that it falls elegantly to the ground.
In association, it is married to simple flowers that he is the most charming.
In a pot, mix it with impatiens or petunias .
In the ground, let the ivy climb in the company of a clematis , or let it run on a bed strewn with daffodils and periwinkles .
So easy going …
Ivy ‘Parsley Crested’ has the same requirements as other ivy, that is to say they are minimal: all exposures are suitable for it, it does not fear pollution, spray or wind, and has the ability to live both outdoors and indoors. In the garden, if it is able to grow in the most remote and dark corner of the garden, it would be a shame to confine it there, so much is its special beauty to be highlighted. When planting, do not skimp on the addition of compost if the conditions are difficult, such as when installing on a slope.
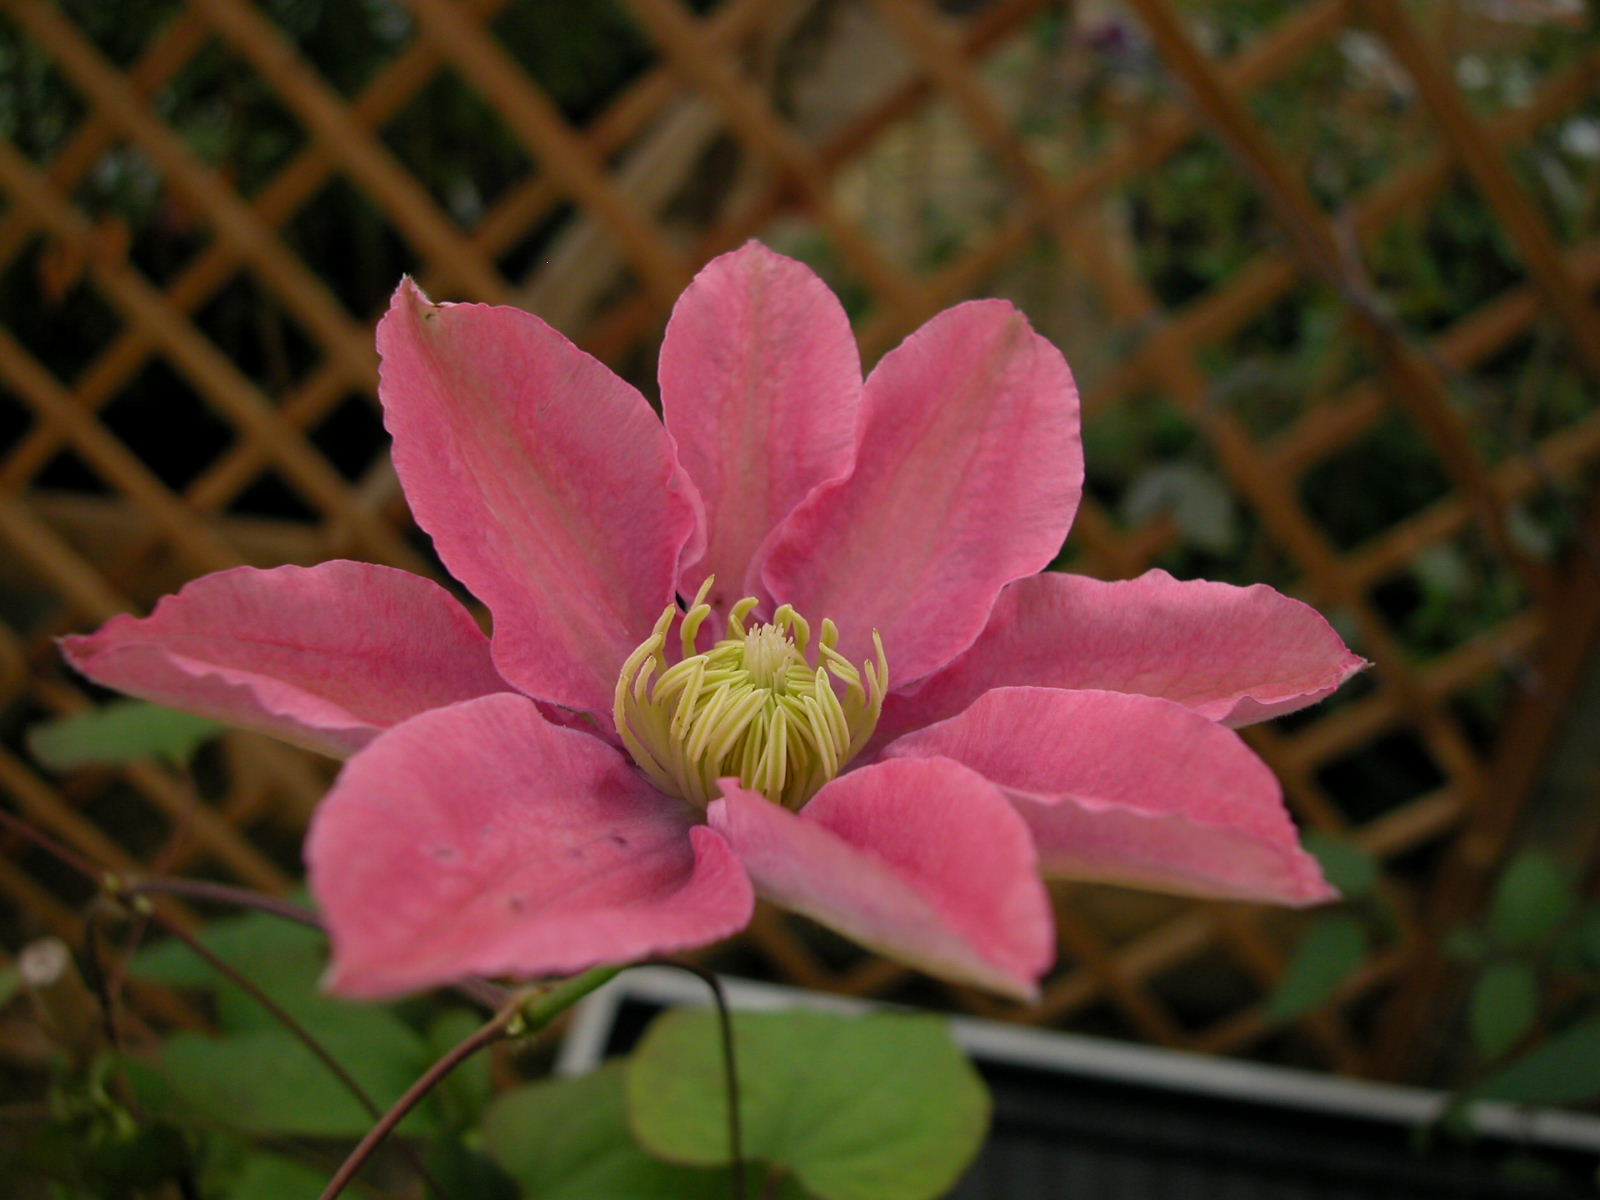
Attractive by its refined color and its long flowering, this climber can wrap itself around a tree, on a pergola or a fence.
Twirling plants, clematis attach themselves on their own thanks to a flexible petiole which wraps around a support. ‘Little Mermaid’, a large-flowered variety created in 2010, stands 2-3m tall in season. Its herbaceous stems with deciduous foliage are adorned, from May to June, with semi-double flowers, 8 to 12 cm in diameter. Their flesh-pink falls – a new color for clematis – are tinged with almond green on the reverse and surround a toupee of pale yellow stamens. After a short break in summer, flowering begins again in September.
Culture sheet
Latin name: Clematis ‘Little Mermaid’. Situation: grows in all regions, even very cold, without winter protection. Exposure: bright, but not hot. Planting in the east or west is perfect. Soil: deep, fertile, cool, without stagnant moisture. Add organic matter (compost, potting soil, etc.) in very sandy or clayey soils.about:blankclosevolume_off
Where to install it?
She likes ventilated places: at the foot of a trellis, a wire fence or a pergola pillar, rather than against a wall. It can also climb a tree or grow in a tray fitted with a trellis.
Planting
Plant this clematis in spring by burying the bottom of the stem 15 cm deep. Install a bushy perennial to shade its foot.
Watering
In dry season, water lightly but regularly.
Cut
At the end of winter, shorten every other branch to 50 cm from the ground.